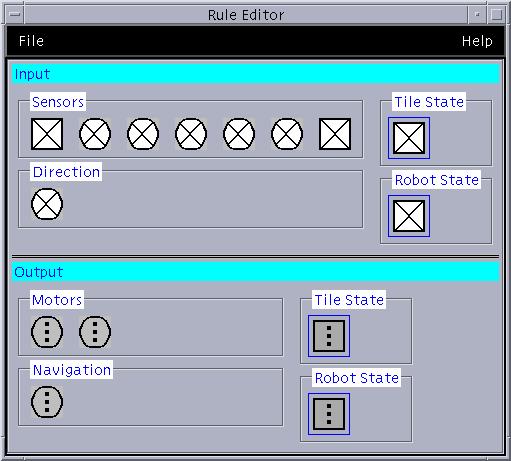
The rule editor is used to modify rules for Altaira. Rules have four types of inputs: the robot's sensors, the state of the current tile, the robot's state and the robot's direction; and four types of outputs: motors, tile state, robot state and navigation. Information regarding rule development may be obtained by reading Altaira: A Rule-based Visual Language for Small Mobile Robots; 3.6 Ruleset development and debugging. Examples may be obtained at 4. Example Altaira Rulesets.
Click on the icons below for more details regarding functionality of the Rule Editor screen.
Finally other information regarding rules my be obtained by reviewing the theory of operation; or Altaira: A Rule-based Visual Language for Small Mobile Robots; 3.3.1 Rule Inputs, 3.3.2 Outputs and 3.4 Rule Amalgamation and Subsumption.
| |
|
Also shown are the "pull-down" windows available from each of the
areas within the rule editor.
Rule Editor Pull-Down Windows | ||
| Input State Tiles | Output State Tiles | |
 |
 |
 |
| Input Robot States | Output Robot States | |
 |
 |
 |
| |
 |
|
Edit option from Execution
Engine's file menu.
To build a rule (or edit an existing rule), click on one of the sub-windows of the editor:
Sensor Choices from Pull-Down Menus | ||
| |
|
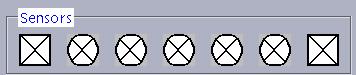
Place the cursor over a sensor and click
to retrieve a pull down menu of
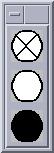
selected options. The square sensors represent touch sensors
(or bumper sensors) where as the round sensors
represent light sensors.
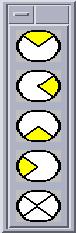
In both cases, white represents OFF (or the sensor is reading nothing) and black represents ON. A sensor having a cross is a "don't care" meaning it does not matter what the reading of that particular sensor is. Different rules must be written for different sensor combinations. |
The following sections discuss what is found in each of the
pull-down menus windows.
The tile states appear in two of the pull-down menus, because the
State Editor can be entered through
each option.
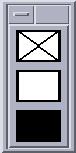
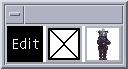
The State Editor can be accessed by clicking on the 'Edit' button. It
is in the
State Editor
that new tiles (or states) can be defined (actually drawn). The white
button with a cross in the middle is a "don't care" meaning the tile state
doesn't matter. The gray button
represents an unknown tile. The button with the green
circle represents the start (home) position.
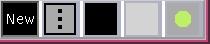
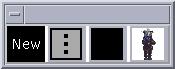
Output states (or tiles) can be defined just as input states are defined. This
time the State Editor is accessed by using the
'New' button. The gray button with verticle dashs means 'continue as before'.
The black button represents an undefined state meaning the robot
is off the map. The gray button means the robot is on the map, exploring
but has not yet determined the nature of the tile. Finally, the button with
the green circle means that the tile is the 'home' or begining tile.
As states are created using the State Editor, the newly created states are
added to the selection palate.
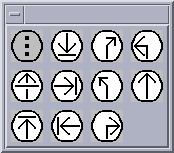
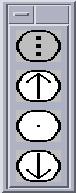
Navigation is how an Altaira user can tell the robot to negotiate a tile
where these particular sensor reading (ones previouly chosen). From left
to right these navigation icons mean:
Tile States
Example of Input Tile States
Example of Output Tile States
Direction
 The robots direction can be selected to be North,
East, South, West or 'don't care'.
The robots direction can be selected to be North,
East, South, West or 'don't care'.
Navigation
Motors
 Each motor can be set to Continue, Forward, Off, or Reverse respectively.
Robot
| |
|
|
|
Altaira has a global robot state. As the robot moves from tile to tile,
the global robot state keeps current information about the robot;
The Rule Editor is exited when the user selects Close
from Rule Editor file menu.