Git and Github
In this course you will use the repository system Git, along with the popular hosted repository site GitHub. You will need to have a free student GitHub account in order to do the course individual and team project work. It would be a good idea for you to have a GitHub account and use it to host any significant course and extra projects that you have done, so that you can show recruiters a portfolio of your work.
Git is not GitHub! GitHub is a hosted site of Git repositories and many other tools. Git is simply a repository-based revision control system.
I have links to resources at the bottom of this page, but GitHub Docs is important enough to put up here. A great resource!
Most Frequent Git Commands
| Command | Description |
|---|---|
| git clone repository-URL | clones the github repo into your local filespace (creates a local copy of the repo) |
| git status | gives information about the current status of your local repo and workspace |
| git add filenames | adds a local new/changed file into the next repo commit (can be used with a directory name but be careful!) |
| git commit -m ‘your commit message here’ | commits changes of all repo files into the LOCAL copy of the repo (message quotes are needed) |
| git push | pushes the committed changes to the local repo on to the Github repo |
| git pull | pulls changes made to the Github repo into the local repo (fetch+merge) |
| git checkout branchname | switches your workspace files to be those for the named branch |
Git
Revision control systems, also known as code repositories, source code control systems, and other names, are tools that manage the changing files that make up a project. They provide consistent and clear mechanisms for keeping track of all file changes and for documenting why those changes were made. In addition, they provide the capability to retrieve any historical version of any file in the project. You don’t have to copy your files to backup places anymore!
Git is extremely flexible, but this also makes it extremely complicated! Few Git users actually understand it. This is the reason that for years I have used the simpler Subversion for my courses; but Git seems to rule the world now.
There are many tutorials for Git, and the official site has extensive documentation, including an entire book (chapters 1-2 is enough get you started). The available cheatsheet will be a good resource, too. Do not expect that you can get by with doing copy+paste Git commands without understanding what they are doing; you will cheat yourself out of learning, and you will most likely make a mistake and lose a lot of work in the process. Learn Git!
Two important facts: one, Git does not automatically commit your modified files, you must “git add” every file that you want to commit; two, when you do “git commit”, you have only committed your changes to your local Git repository. You must “git push” the commit in order for it to go out to the remote repository (on GitHub, for us).
GitHub
Git itself does not impose a central-repository model on developers, but GitHub essentially acts as the central “official” repository for a GitHub-hosted project. This is nice as it then simplifies things for us.
With GitHub, we ask GitHub to create the project repository for us, and so we never do “git init”. Once it is created, we use “git clone” to clone the central GitHub repository onto our own machine (or into our CS account home directory space). This also creates the working copy that you can do your work in. You can use “git clone” to create as many working copies as you want (in your CS account, on your laptop, on your home computer, etc.). And once you have committed and pushed all of your changes, you could actually delete the whole thing and not lose anything (but you had to have pushed it, not just committed it).
On a team, others will also push their changes to the shared GitHub repository, and you will need to retrieve these into your own copy. To get others’ changes from a shared GitHub repository, you must use either “git fetch” or “git pull”. You need to read more about these differences, but in short, “git fetch” only fetches changes that exist in the GitHub repo, it does not try to merge them into your repo (you have to then use “git merge” to do this); “git pull” does both a fetch and a merge, and is useful if you know that you don’t have to be careful about handling some manual merges.
Github Repo Interaction
The picture below captures the main data flow interaction as you use Git and Github:
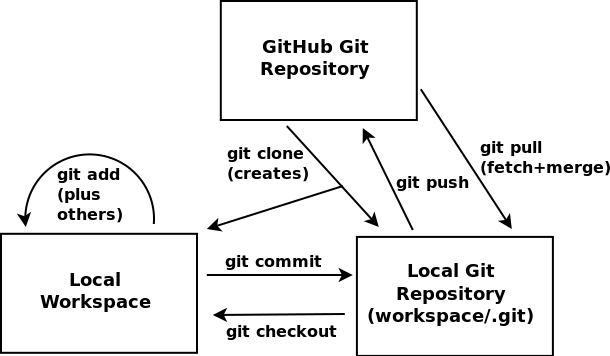
The main ideas in the image above are these: 1) “git commit” does not push anything to Github, only into your local repository copy 2) “git clone” creates both the local repository copy and your workspace; your workspace is actually what you see in your files, the local repository is hidden in a “.git” subdirectory which you don’t normally see and never use directly as files! You can use “git checkout” to change your workspace to other versions of your repo files (branches, old versions, etc.). In most class work you should never need to use “git checkout”, until you use branches in your project.
Tutorials and Cheatsheets
The Git home has extensive documentation including a PDF cheatsheet.
Atlassian has a bunch of Git tutorials and has a nicer cheatsheet
GitLab (something similar to GitHub but locally installable) has great documentation on using Git and has a very nice PDF cheatsheet.
GitHub also has plenty of material in GitHub Docs. A good starting point is their Hello World example, and other good points are Git, using Issues, and good workflow.
Workflows
Atlassian has a nice tutorial on different workflows that you can use with Git.
Other Resources
Git for Windows (and also here) seems to be the most popular Git toolset for the Windows platform. It includes a “git bash” shell that lets you use git command-line tools.
TortoiseGit also appears to be a popular Windows Git tool.
It also seems that PowerShell is something you should definitely learn to use if you are a Windows user.
If you become a very active GitHub user, you will definitely want the GitHub Command Line tools.
Prof. Michael Ernst has a good resource on Repository Best Practices along with other good advice.