Lab 1 - CS480 M01
CS 480 M01 Lab Session 1 - 2022 Fall
Purpose:
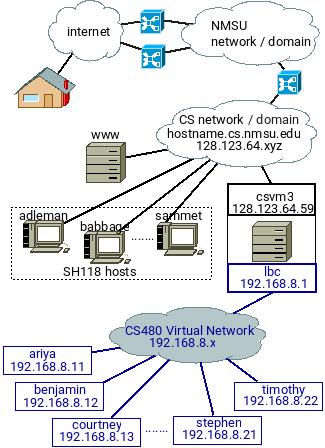
Install and configure OpenSUSE Linux on your assigned CS480 virtual machine (on CS VMWare server csvm3.cs.nmsu.edu).
Once done you will have a host on CS480 virtual network available to you 24/7 and reachable through csvm3:
Make sure that everything gets installed and gets set as instructed below. Be meticulous.
Nevertheless, do not just follow the steps below. Check and EXPLORE the other options before
proceeding. Read the online help whenever there is something unclear to you.
Connect to your virtual machine at csvm3.cs.nmsu.edu
- either through vmware software installed on your own computer
(CS students can get it free from our department's subscribtion to the
VMWare Academic Programs at OnTheHub)
- or by ssh-ing into csvm3 wtih X11 forwarded and executing command
vmware.
On a Linux host you can do the second option (through ssh) by openning a shell window, ssh into csvm3 with X11 forwarding enabled (-X), and start vmware workstation: somehost % ssh -X csvm3.cs.nmsu.edu
csvm3 % vmware
There is a virtual machine prepared for each student named yourcsloginname_cs480fa22. It is configured to have 2GiB of memory , two CPU cores, 40 GiB hard disk, and it is connected to a virtual network that is shared with virtual machines of other students in the class. The virtual machine is not installed with any operating system and our task today is to install it with 64-bit OpenSUSE Leap 15.4 Linux. Installation DVD is in the DVD drive of the virtual host.
Create another snapshot for your machine: VM -> Snapshot -> Take Snapshot.... Name the snapshot beforeLab1.
Note for below:
- Click into the virtual machine window to work within it (within the virtual machine).
- Use [ Ctrl ] + [ Alt ] (Linux) or [ control ] + [ cmd ] (MacOS) to release control / focus from the virtual machine and to get regular mouse control over your desktop.
Power on your virtual machine into BIOS and modify it:
Vith a real PC you would accomplish this usually by holding [ F10 ] or [ F2 ] shortly after the machine is powered on.
With vmware, click on VM -> Power -> Power on to Firmware
- Change the Supervisor Password (currently there is no BIOS pasword set) to whatever you like (MAKE SURE TO WRITE IT DOWN AND SUBMIT WITHIN YOUR ASSIGNMENT REPORT - if you lose this password you will have to go back to the
beforLab1 snapshop or, if you do not have any snapshot, start from scratch with new virtual machine and new install )
- Change the booting sequence to boot from CD first, from HDD (virtual SCSI disk) second, and third from the network.
- Check that the date/time is correctly set (or fix it and set it to the current date and time )
- Save the changes and exit the BIOS and ...
- Power off the virtual machine (
VM -> Power -> Power Off), create another snapshot (name it fwModified), and power the virtual machine on into BIOS again to make sure that the above (password, boot order, ..) is set correctly.
- This may be a good time to try to practice how to work with snapshots. Revert to the first snapshot and observe that you can power the machine on into BIOS and it does not ask for the password. After that select the 2nd snapshot and observe that this time the machine will not allow you to enter BIOS without providing the correct password.
- Proceed with the linux installation as outlined below.
Boot the machine from the Leap 15.4 DVD, and once the first menu appears
Immediately click into the window and push [F4] function key and select DVD as the installation source.
Choose Installation ( 2nd line) from the menu and hit [ Enter ]
Observe as the kernel gets loaded and installation starts. Once the green growing bar appears you may want to hit [ ESC ] key and observe what is happening (be patient this step takes some time).
Installation:
- Leave English (US) for the language and keyboard layout, and click Next to proceed.
- Network Setting
- Overview
- Edit the network interface config. Once you click Edit select (under Network Card Setup) Statically Assigned IP Address (no DHCP) and set your IP address to be
192.168.8.x
where depending on your name the x is
- ariya
- benjamin
- courtney
- hunter
- jose
- josh
- logan
- malyk
- marco
- shannon
- stephen
- timothy
- baokun
- Subnet Netmask: 255.255.255.0 or /24
- Hostname: your name in lower case as spelled out above
- Hostname/DNS
- Static Hostname: use your first name in lower case again as listed above
- Set the Set Hostname via DHCP to NO (do not use DHCP !)
- Modify DNS Configuration: Only Manually
- Name Servers and Domain Search List: leave empty
Routing: leave empty
Activate online repositories now?: No
System Role: Server (Text Mode)
Partitioning:
(this may be one part of this lab where you may need to look around more, explore, and perhaps try couple of times before getting it right)
Click on the Guided Setup, click Next (do not select LVM nor disk encryption),
select BtrrFS for Root Partition,
disable snaphosts (unselect Enable Snapshots),
select Propose Separate Home Partition and select Ext4, and keep selected Separate Swap Partition.
Click Next and
after that
go to Expert Partitioner => Start with Current Proposal
and modify the partitions to keep the suggested layout but make one change : the sda3 partition's mount point will be /extra (not /home).
The result should be as follows:
- /dev/sda1 BIOS Boot Partition 8 MiB
- /dev/sda2 Btrfs Partition 12.66 GiB mounted on / (keep the subvolumes as suggested)
- /dev/sda3 Ext4 Partition 25.33 GiB mounted on /extra
- /dev/sda4 Swap Partition 2 GiB
Clock and Time Zone: USA, Mountain
Create a user for yourself BUT do NOT use the same password
for system administrator and
do NOT have automatic login selected
Set the administrator's/root password (WRITE IT DOWN ON AND SUBMIT WITHIN YOUR ASSIGNMENT REPORT)
Installation Settings
- Go to Software and click on Details.... Use Patterns view. You may also make sure that Autocheck is selected under Dependencies
No packages under Games, Office Software, Multimedia ... , should be selected (if you chose the server system role above).
Remove AppArmor related packages.
Do not add any other packages today.
You will
always be able to add them later as needed. Review and Accept.
- Default systemd target: Text mode.
- Under Security keep the suggested settings (Firewall and SSH service enabled, the SSH port open, ...) except for the Major Linux Security Module. Select None / remove AppArmor.
- Click Install (twice, the second time to confirm installation) and let the installation program format the disk and start the actual installation.
-
Depending on the selections of software you
made this will take about 5 minutes.
Observe the installation progress.
- Skip the online updates and ignore the error messages that the installation media at opensuse.org cannot be reached ...
- The system will reboot once the basic installation is done. Let it boot from the internal disk this time.
Post Installation Steps
- Log into your machine as user
root and add this line
192.168.8.1 lbc
into file
/etc/hosts
(as the last line in the file)
Check the connection to lbc:
ping lbc
(stop by [ Ctrl ] + [ C ] )
Login into lbc
ssh your_cs_login_name@lbc
Login back into your virtual machine from lbc (lbc=csvm3 - these are just two hostnames for the same machine for its two different interfaces on two different networks)
ssh your_user@your_virtual_machine_name
log out from your computer as well from lbc
shutdown the computer : shutdown -h now
Boot into Firmware and change the settings to boot from internal hard disk first
Boot the host (from the HDD)
Shut the host down one more time
Create new snapshot and name it Original_Installation
Power the VM up for the final time and let it run